From Zero: The Complete Guide to Building a Native iOS App with AI
Written for everyone with an idea but blocked by code.
Honestly, two years ago if someone had told me "you don't need to know how to code, but you can build a native iOS app and get it on the App Store," I probably would have smiled politely. But today, that's exactly what happened. Not some half-baked product cobbled together on a low-code drag-and-drop platform — a real Swift + SwiftUI native application, the kind that can pass App Store review.
This article will walk you through the entire process step by step. Starting from registering an Apple Developer account, to having AI write all your code, to testing on a real device and debugging. Nothing will be skipped, and nothing will be assumed you "should already know." If this is your first time touching iOS development — or even your first time opening a terminal (that black-and-white command-line window) — that's fine. Just follow along.
I've broken the whole process into six phases. At the end of each phase you'll see a clear concrete result — you won't get that lost feeling of "I did a bunch of things but I don't know what I actually accomplished."
Chapter Zero: Get Your Tools Ready
This chapter is all preparation work. It's a bit tedious, but you only have to do it once. Everything that comes after builds on this foundation. If you've never set up a development environment before, set aside half a day for this chapter. Most of the time is actually spent waiting for downloads.
1. Register an Apple Developer Account
First, let me clear up something a lot of people get confused about: your Apple ID and your Apple Developer account are not the same thing. The account you use to download apps and buy music is your Apple ID — almost every Apple user has one. The developer account is an additional qualification you purchase on top of your Apple ID. You need it to submit apps to the App Store.
If you don't have an Apple ID yet, go to appleid.apple.com and register one first. There's one detail to watch out for during registration: in the name field, enter your real legal name — not a nickname or company name. Apple verifies identity information during the developer qualification review, and if the names don't match, the review will get stuck and changing your name will cost you several extra days.
Also, your Apple ID must have Two-Factor Authentication enabled. This is a hard requirement for enrolling in the developer program. Go to Settings → your name → Password & Security on your iPhone and check — if it says "Two-Factor Authentication: On" you're good.
Once you have an Apple ID, go to developer.apple.com/programs and click "Enroll." Apple will walk you through a series of steps: confirm your identity, agree to the developer agreement, then pay. The fee is $99 per year (roughly 688 RMB in China). Credit cards and some local payment methods in certain regions are accepted.
It doesn't take effect immediately after payment. Apple needs to review your identity, which typically takes 1 to 3 business days, occasionally stretching to a week. If you're registering as an individual, the review will be faster. If you're registering as a company, you'll also need to provide a D-U-N-S number (Dun & Bradstreet code) — that's a separate process I won't get into here. For individual developers, personal registration is sufficient.
After the review passes, you'll receive a confirmation email saying you're now a member of the Apple Developer Program. At that point you can move on to the next step.
A question you might have: can I skip the $99 for now and pay later? The answer is yes. Apple allows you to install and test apps on your own phone using a free Personal Team at no cost. But this approach has a few limitations: the signing certificate is only valid for 7 days (after 7 days the app won't open — you'll need to reinstall it), and you can't submit to the App Store. So if you're serious about publishing your app, I recommend paying now. The process will go much more smoothly.
2. Create a Bundle ID and App Store Connect App
Once your developer qualification is approved, you need to do two things: register a Bundle ID, then create your app record in App Store Connect.
What is a Bundle ID? Simply put, it's the globally unique identifier for your app. Every iOS application has one, and no two can be the same. It uses reverse-domain notation, for example: com.zhangsan.moodtracker. The first part (com.zhangsan) is called the Organization Identifier, typically your domain name written in reverse; the second part (moodtracker) is your app name. If you don't have your own domain, using com.yourname works fine — as long as it's globally unique.
Now, open developer.apple.com and log in to your developer account. In the left sidebar, find "Certificates, Identifiers & Profiles" and click into it. Then in the left menu select "Identifiers" and click the plus sign (+) in the upper right.
On the "Register a new identifier" page, select "App IDs" and click Continue. Next select "App" (not App Clip), then click Continue.
You'll see a form. The Description field can be anything, like "My Mood Tracker App" — this is just a note for yourself. For Bundle ID, select "Explicit", then in the input field below enter the Bundle ID you've chosen, such as com.zhangsan.moodtracker.
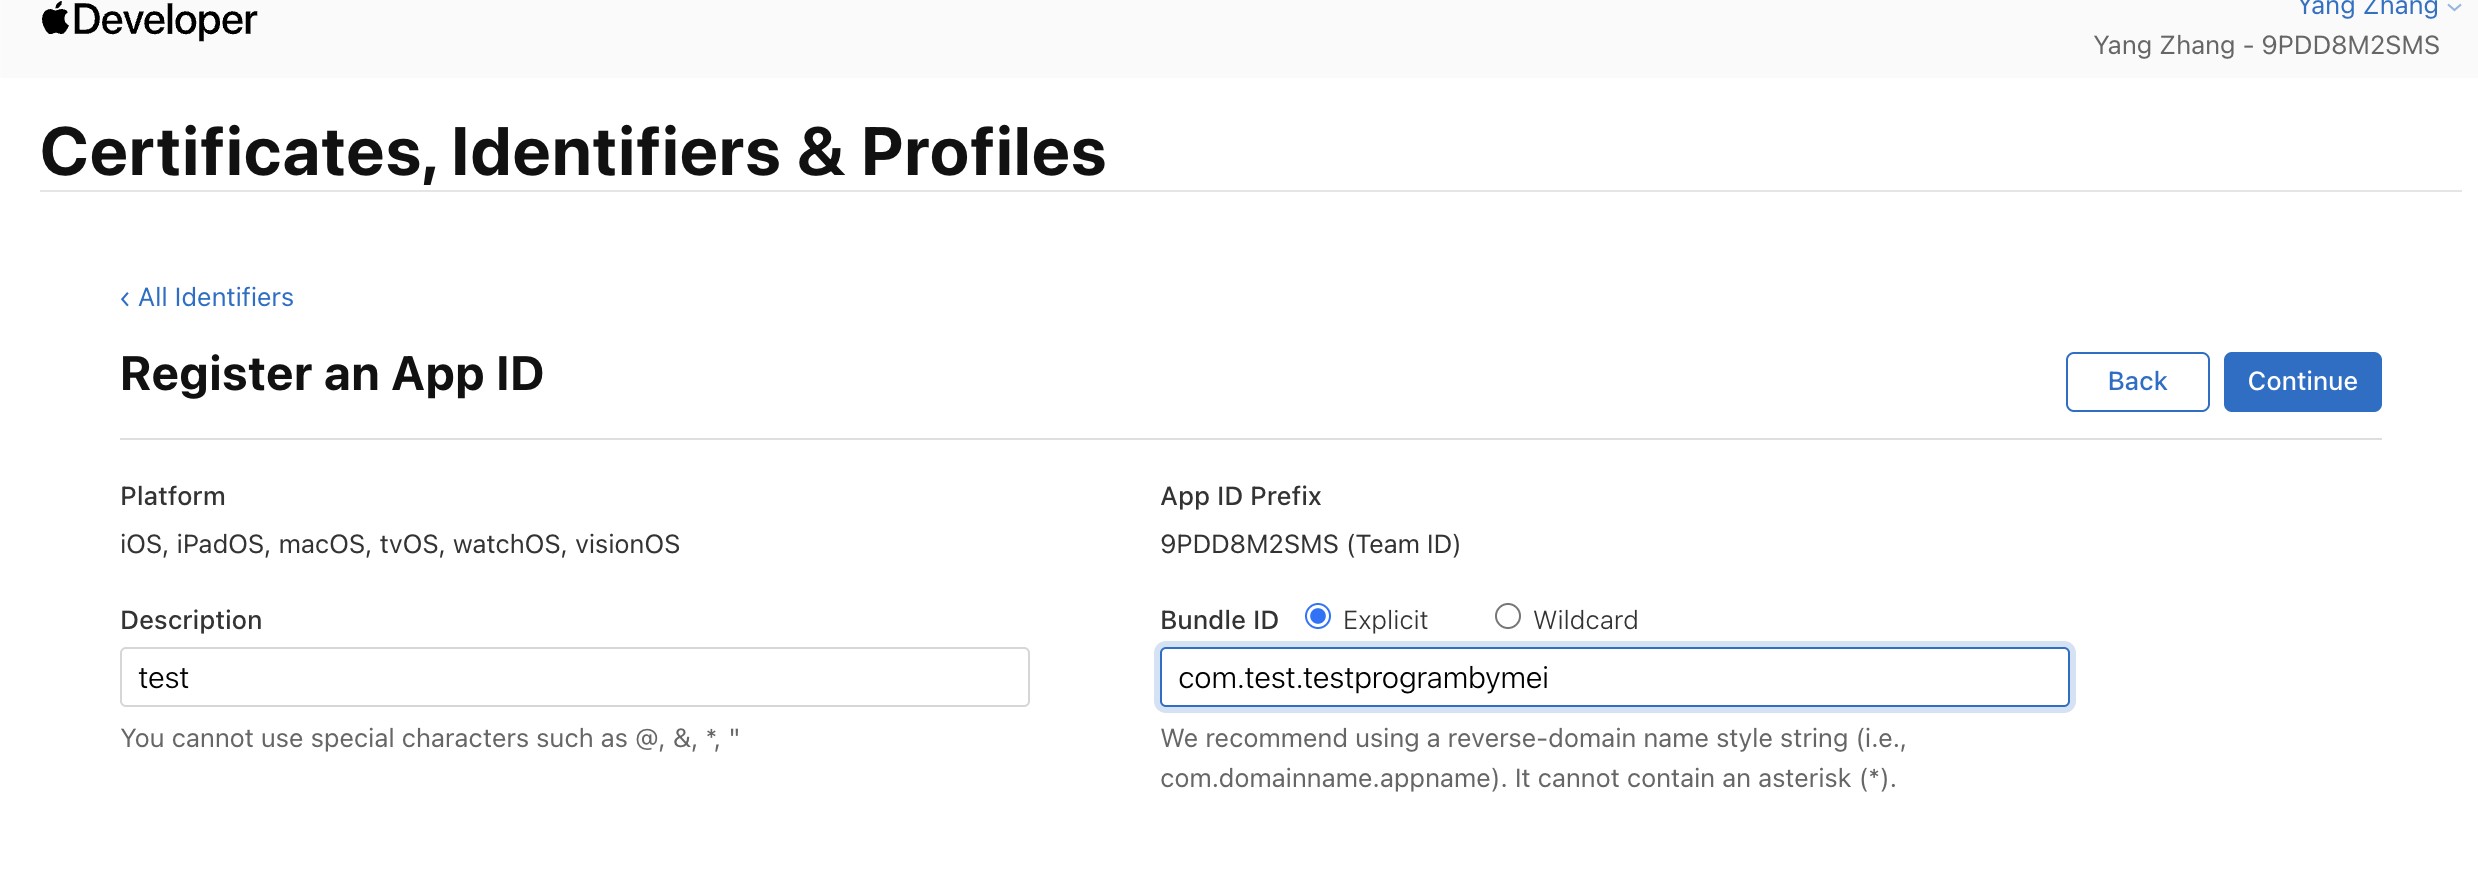
Below that is a long list of Capabilities (app capabilities), like Push Notifications, Sign in with Apple, etc. Don't worry about these now — leave the defaults for now, and come back to enable what you need later. Click Continue, and after confirming everything looks correct, click Register.
The Bundle ID is registered. Now go to App Store Connect.
Open appstoreconnect.apple.com, log in, and click "My Apps". Then click the plus sign in the upper left and select "New App".
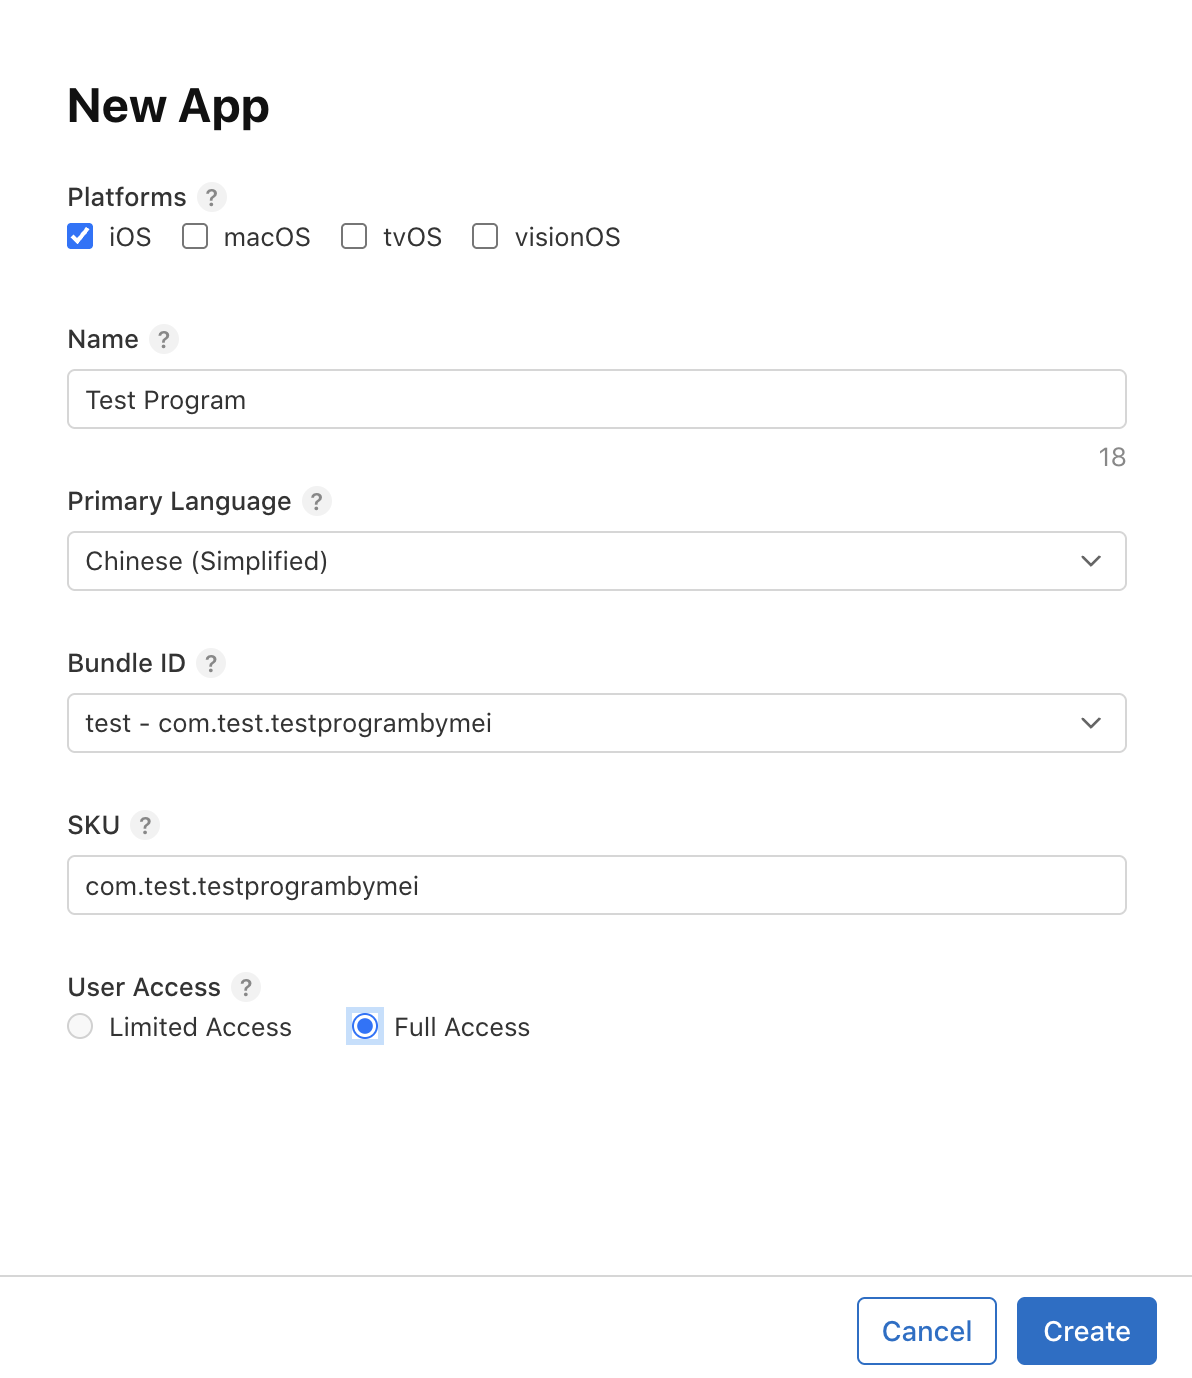
A form will pop up asking you to fill in several fields:
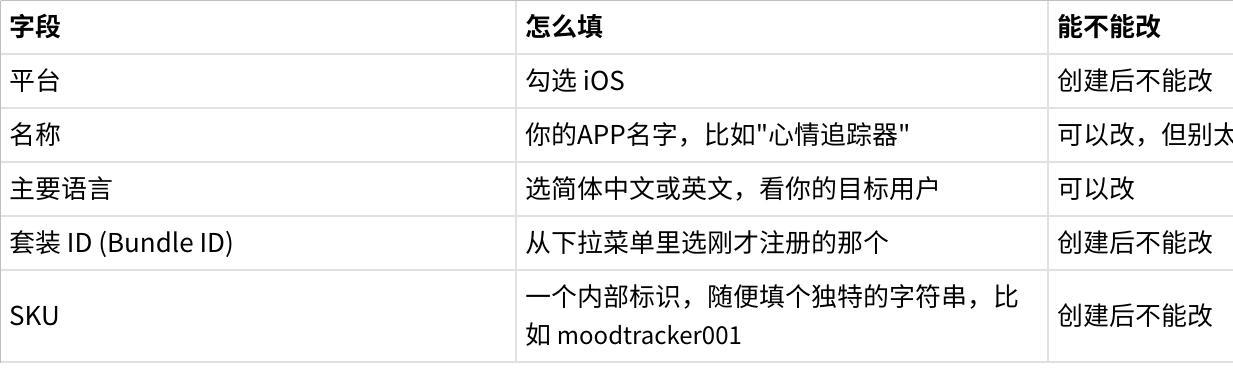
Two fields cannot be changed after creation — Bundle ID and SKU. So think carefully before filling them in, especially the Bundle ID, which runs through your entire development process.
Click "Create" and your app record will appear in App Store Connect. Even though it's just an empty shell right now (no actual app package uploaded), its Bundle ID is already registered in Apple's system.
3. Install Xcode
Xcode is Apple's official development tool. All iOS applications ultimately need to be compiled, signed, and packaged through it. Even if AI writes all your code, you still need Xcode to turn that code into an app you can install on your phone.
Open the App Store on your Mac, search for Xcode, and click Get.
Heads up: Xcode's installation package is very large, around 12 to 15 GB. Including the decompression and component configuration during installation, you'll need at least 35 GB of free disk space. If disk space is tight, clean up first before downloading. With a slow connection, this step might take an hour or two.
After installation, open Xcode for the first time. It will show a dialog saying it needs to install Additional Components, including various simulator runtimes and Command Line Tools. Click "Install" and wait for it to finish. This step also takes a few minutes.
Once the components are installed, there's one more thing to do: add your Apple ID to Xcode so it can handle code signing for you. The path is: Xcode menu bar → Settings (or press Cmd + comma), select the Accounts tab, click the plus sign (+) in the lower left, select "Apple ID", then log in with your developer account.
After logging in successfully, you should see your Apple ID on the Accounts page, with your team name below it (if you're an individual developer, it will show your name with "(Personal Team)"). This means Xcode is now linked to your developer account.
Verify everything is working: in Xcode, create a temporary empty project (File → New → Project → iOS → App), and in the Team dropdown you should be able to see your name. If you can, the configuration is correct — you can close this temporary project.
4. Install Command Line Tools
Next you need to install a few command line tools. If you've never used a terminal before, here's how to find it: search for "Terminal" in Mac's Launchpad, or use Spotlight (press Cmd + Space) and search for "Terminal", then open it.
You'll see a window with a white or black background, with a line of text and a blinking cursor at the end. That's the terminal. You need to type commands here. After typing each command, press Enter to execute it.
Step 1: Install Homebrew
Homebrew is the most commonly used package manager on Mac. Think of it as a "software installer" — many development tools can't be downloaded from the App Store and need to be installed through Homebrew. Type the following command in your terminal:
bash/bin/bash -c "$(curl -fsSL https://raw.githubusercontent.com/Homebrew/install/HEAD/install.sh)"After pressing Enter, it will start downloading and installing. It may ask you to enter your Mac login password (when typing, nothing will appear on screen — this is normal, just type the password blindly and press Enter). The installation takes about two or three minutes.
Here's a pitfall many people fall into. If you're using an Apple Silicon Mac (M1, M2, M3, M4 series), Homebrew installs to /opt/homebrew. But by default, this directory is not in the system's PATH (think of PATH as the list of places the system looks for programs). After the installation script finishes, the terminal will show some highlighted lines prompting you to run additional commands to configure PATH. Usually these two lines:
bashecho 'eval "$(/opt/homebrew/bin/brew shellenv)"' >> ~/.zprofile
eval "$(/opt/homebrew/bin/brew shellenv)"
You must run these two lines. Otherwise when you type brew commands later, the system will say "command not found" — that means PATH wasn't configured properly.
If you're using an older Intel-chip Mac (bought before 2020), Homebrew installs to /usr/local, which is already in PATH by default, so no extra configuration is needed.
After installation, run the verification command:
bashbrew doctorIf you see "Your system is ready to brew", it's installed successfully.
Step 2: Install Node.js
You might wonder: why do I need Node.js for an iOS app? The reason is that the two tools we'll use later — Cloudflare's Wrangler (backend deployment tool) and Claude Code / Codex CLI (AI coding tools) — are both written in Node.js. You don't need to write any Node.js code; you just need it as a runtime environment.
bashbrew install nodeAfter installation, confirm:
bashnode --version
npm --version
If both commands output version numbers (like v22.x.x and 10.x.x), Node.js and npm (Node's package manager) are both installed. Note: Codex CLI requires Node.js version 22 or above. If you install through brew, you'll get the latest version by default, so this usually isn't a problem. But if you installed an older version of Node.js before, you can run brew upgrade node to update.
Step 3: Install Wrangler
Wrangler is Cloudflare's command line tool. We'll use it later to deploy the backend API and landing page.
bashnpm install -g wranglerThe -g flag means global installation, so after installing you can use the wrangler command from any directory.
Verify:
bashnpx wrangler --versionIf you see a version number, it worked.
Step 4 (Optional): Install Git
Mac comes with Git (via Xcode Command Line Tools), so you probably don't need to install it separately. In the terminal, type git --version — if you see a version number, you're good. Git is a code version management tool. Once the AI has generated a lot of code, using Git for version management is very handy — if something breaks, you can roll back to a previous version.
5. Register a Cloudflare Account
Go to cloudflare.com and register an account. The Free Plan is sufficient — no credit card required.
Why do you need Cloudflare? Because the vast majority of apps don't run purely locally. A usable app typically needs these server-side capabilities: user registration and login, data syncing in the cloud, image and file upload storage, and a landing page for users to download the app. All of this needs a "backend" to support it.
The traditional approach is to rent a server, set up a database yourself, configure a domain, handle operations. That's too heavy for a project just getting started. Cloudflare has packaged all of this into several ready-to-use services — no server management needed, and the free tier is very generous for personal projects:

These free tiers should hold up until your app has several thousand active users. By then you can consider upgrading your plan.
After registration, go back to the terminal and log in to Wrangler:
bashnpx wrangler loginThis command will automatically open your default browser and redirect to Cloudflare's authorization page. After confirming login, the browser will show "Successfully logged in", and the terminal will also show a successful login message. You won't need to log in manually again when using Wrangler to deploy code later.
6. Install AI Coding Tools
Now we're at the most important part of this chapter. You need to choose an AI coding assistant — this is what will generate all your code going forward.
My recommendation is only two options: Claude Code or Codex CLI. Don't use anything else. I'll explain both tools clearly below so you can choose based on your budget and preference.
Claude Code is Anthropic's command line coding tool. It runs directly in the terminal, can read all files in your project, and creates and modifies code in bulk based on your instructions.
To use Claude Code, you need to subscribe to an Anthropic paid plan. There are several tiers to choose from:

I recommend at least Max 5x. Although the Pro plan can also use Claude Code, the usage limit is too tight — during the process of AI generating a complete app, it needs to read large amounts of files, think through multiple rounds, and repeatedly modify code, and 45 messages burns out very quickly. The Max 5x usage lets you complete a project fairly comfortably. If budget allows, Max 20x is even better, especially if you plan to do a lot of debugging and iteration during development.
Install Claude Code:
bashcurl -fsSL https://claude.ai/install.sh | bashAfter installation, type claude in the terminal and press Enter. The first run will ask you to log in to your Anthropic account — follow the prompts. After successful login you'll see an interactive interface showing that Claude Code is ready. Type /exit to quit; you'll start it again when you actually use it later.
Codex CLI is OpenAI's command line coding tool, similar in purpose to Claude Code — it also operates on project files directly in the terminal.
Using Codex CLI requires a paid ChatGPT subscription. The good news is you can start with the Plus plan ($20/month). But similar to Claude Code, cheaper plans have usage limits — for developing a full project I recommend the Pro plan ($200/month). Codex CLI uses the GPT-5.4 model, which is also very strong at code generation.
Install Codex CLI:
bashbrew install codexNote: Codex CLI requires Node.js 22 or above. If your Node version is older, upgrade it first with brew upgrade node.
After installation, type codex in the terminal and press Enter. The first run will prompt you to choose an authentication method — select "Sign in with ChatGPT" and follow the prompts.
Why Not Use Other Tools?
There are many AI coding tools on the market — Cursor, Windsurf, GitHub Copilot, Cline, various editor plugins. They're all great for everyday coding assistance, but in the scenario of "generating a complete project from scratch," none of them match Claude Code and Codex CLI.
The reason is a difference in how they work. Tools like Cursor and Copilot are embedded in editors and process one file at a time — they're good at "you've written half the code and it helps you complete it." Claude Code and Codex operate directly on the entire file system in the terminal — they can read all the files in your project at once, then batch-create dozens of new files, set up the project structure, and write all the frontend and backend code. This holistic generation capability is something embedded editor plugins simply can't do.
Also, don't use any third-party API relay services. I'm talking about those middleman services that claim to provide access to Claude or GPT APIs at lower prices. The problem isn't just the price (it often actually works out more expensive) — the bigger issue is that model capability gets degraded. Context length may be truncated, tool use capability may be incomplete, and response speed is unstable. In the high-load scenario of generating a complete app, any single point of degradation can cause the generation to fail halfway or seriously reduce code quality. Use official subscriptions — pay once for the full capability.
7. Install Agent Skills
I've packaged all the skills into a Git repository. Install them directly with this command:
bashgit clone https://github.com/ZacharyZhang-NY/iOS-Dev-Skills.git && cp -r iOS-Dev-Skills/skills ~/.claude/ && cp -r iOS-Dev-Skills/skills ~/.agents/8. Preparation Checklist
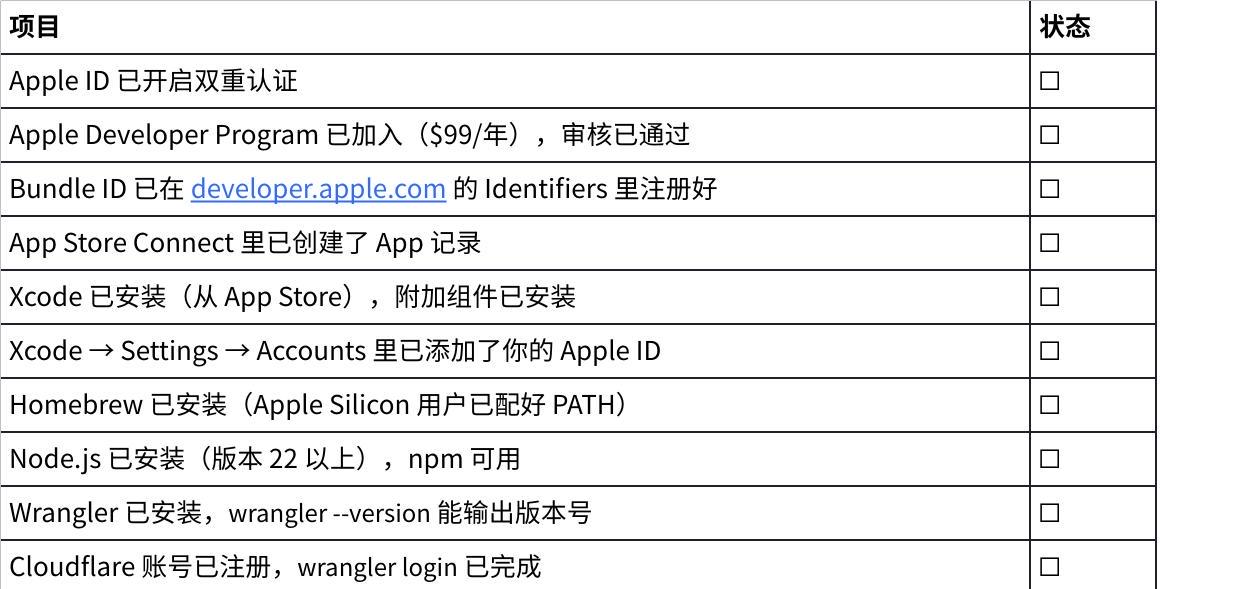
After getting this far, you've put in quite some time. Confirm that you now have all of these:
Chapter One: Turn Your Idea into a PRD
You probably already have a vague product concept in mind. Maybe it's a budgeting app, maybe a habit tracker, maybe a niche community tool. But vague ideas can't be fed to AI. If you tell AI "help me make a useful budgeting app," it will make one — but what it produces will likely not be what you had in mind, because you haven't fully figured it out yourself yet.
So you need to first turn your idea into a clearly structured PRD (Product Requirements Document). A PRD isn't anything complicated — it's just a document that describes "what I'm building, who it's for, what features it has, and how data flows." With this document, every step that follows — design, coding — has an anchor point.
Why Use GPT Instead of Claude
For this step of writing the PRD, I recommend using the ChatGPT web interface rather than Claude's web interface. Not because Claude can't write good documents, but for a very practical reason: ChatGPT's web interface has an Agent Mode (sometimes shown as "deep research" or a mode with a search icon) that can search the internet during generation.
This internet search capability is especially useful when writing a PRD. You can ask it to research competitors — what similar apps exist on the market, what are their features, what do users think, which features have the highest user demand, which are pointless? This information would take you hours to research yourself, but GPT in Agent Mode can handle it in minutes.
Claude's web interface can also search the internet now, but in this active, multi-round, autonomous search scenario of Agent Mode, GPT performs more maturely.
And when it comes to writing code later, we'll bring in Claude Code. Each tool does what it's best at.
How to Have GPT Generate a PRD
Open chat.openai.com and log in. Find the mode switch at the bottom of the dialog box (usually a button with a search icon or labeled "Agent") and make sure you're currently in Agent Mode. In this mode, GPT will autonomously decide whether to search the internet while responding.
Then enter the following prompt:
text你是一个资深产品经理和 iOS 原生开发顾问,请根据我提供的基础信息,为一个 iOS Swift 原生 App 生成一份简洁但完整的 PRD,要求内容聚焦实际开发落地,不要扩写无关方向;我会提供的信息只有这些:[填写项目名称]、[填写项目介绍],你需要基于这些信息输出一份适合直接进入设计和开发讨论的 PRD,内容应至少包含产品目标、目标用户画像,核心功能、用户流程、页面结构、权限需求、数据流、技术方案、接口原则和交付范围;其中技术部分固定为:iOS 客户端使用 Swift 原生开发,Landing Page 使用 Cloudflare Pages,API 使用 Cloudflare Workers,接口规范必须遵循 OpenAPI,并提供 Swagger Document,数据库与存储使用 Cloudflare R2 和 D2;如果我提供的信息不足,你只能基于已有内容补全最基础且合理的默认结构,不要擅自添加复杂商业模式、后台管理系统或多余角色设定。GPT will start working. You'll see it searching, organizing information, and writing the document. Depending on the complexity of your requirements, this process might take anywhere from a few minutes to fifteen minutes. It will ultimately output a fairly complete PRD.
A good PRD typically includes these sections:
Product Overview — Two or three paragraphs clearly explaining what this application is, what problem it solves, and who it's for. This text will be used again later (fed to the design tool), so the clearer the better.
Target User Profile — Who is your typical user? What age group? What usage scenarios? What alternatives do they currently use?
Core Features (MVP) — What features to build in the first version. There's a principle here that I'll keep emphasizing: cut, cut, cut more. The fewer features in the first version, the better. Three to five core features is enough.
Future Features — Features you want to add in subsequent versions go here, but won't be built in the first version.
User Flow — The complete path from opening the app to completing a core operation. For example: Open app → Register/Login → See homepage → Add a record → View history.
Data Model — What data needs to be stored? What does the user table look like? What does the business data table look like? What are the fields?
Technical Architecture Suggestions — GPT will suggest what tech stack to use. You don't need to follow it entirely, since Claude Code will make choices based on the actual situation later.
Review Your PRD
Don't just take the GPT-generated PRD and use it as-is. Spend ten to fifteen minutes reading it carefully. Every minute you spend here will save you time during development.
Is the feature scope too large? This is the most common problem. GPT, out of an instinct to "satisfy you," will often list many features. If it gave you fifteen feature points, cut it to five. This isn't laziness — it's methodology. An app with five features can be generated by AI in a day; an app with fifteen features might take a week, and the chance of problems arising multiplies. You can always add features in subsequent versions, but the only goal of the first version is: it runs, it works, it proves the idea is viable.
Is the user flow smooth? Walk through it in your head: if I were a first-time user opening this app, would I know what to do at each step? Is there any step that would be confusing?
Is there anything you particularly care about that GPT missed? Tell GPT your additions directly in the conversation and ask it to update the PRD. Repeat a few rounds until you feel the document truly describes what you want to build.
Finally, copy the entire PRD and save it as a text file (like PRD.md), somewhere you can find it. Several steps later will use its content.
Chapter Two: Let AI Help You Design Your App's Appearance
The PRD describes what your app "does," but it doesn't describe what it "looks like."
You might think appearance doesn't matter much, as long as the function is good. But in actual development, if you don't give AI a visual reference, it will generate interfaces according to its default aesthetic — usually some very "template-like" look: white background, black text, no personality. You'll probably be dissatisfied and then spend a lot of time tweaking the UI.
A better approach is to give AI a "reference image" ahead of time, telling it "I want this kind of feel."
Why Use Variant AI
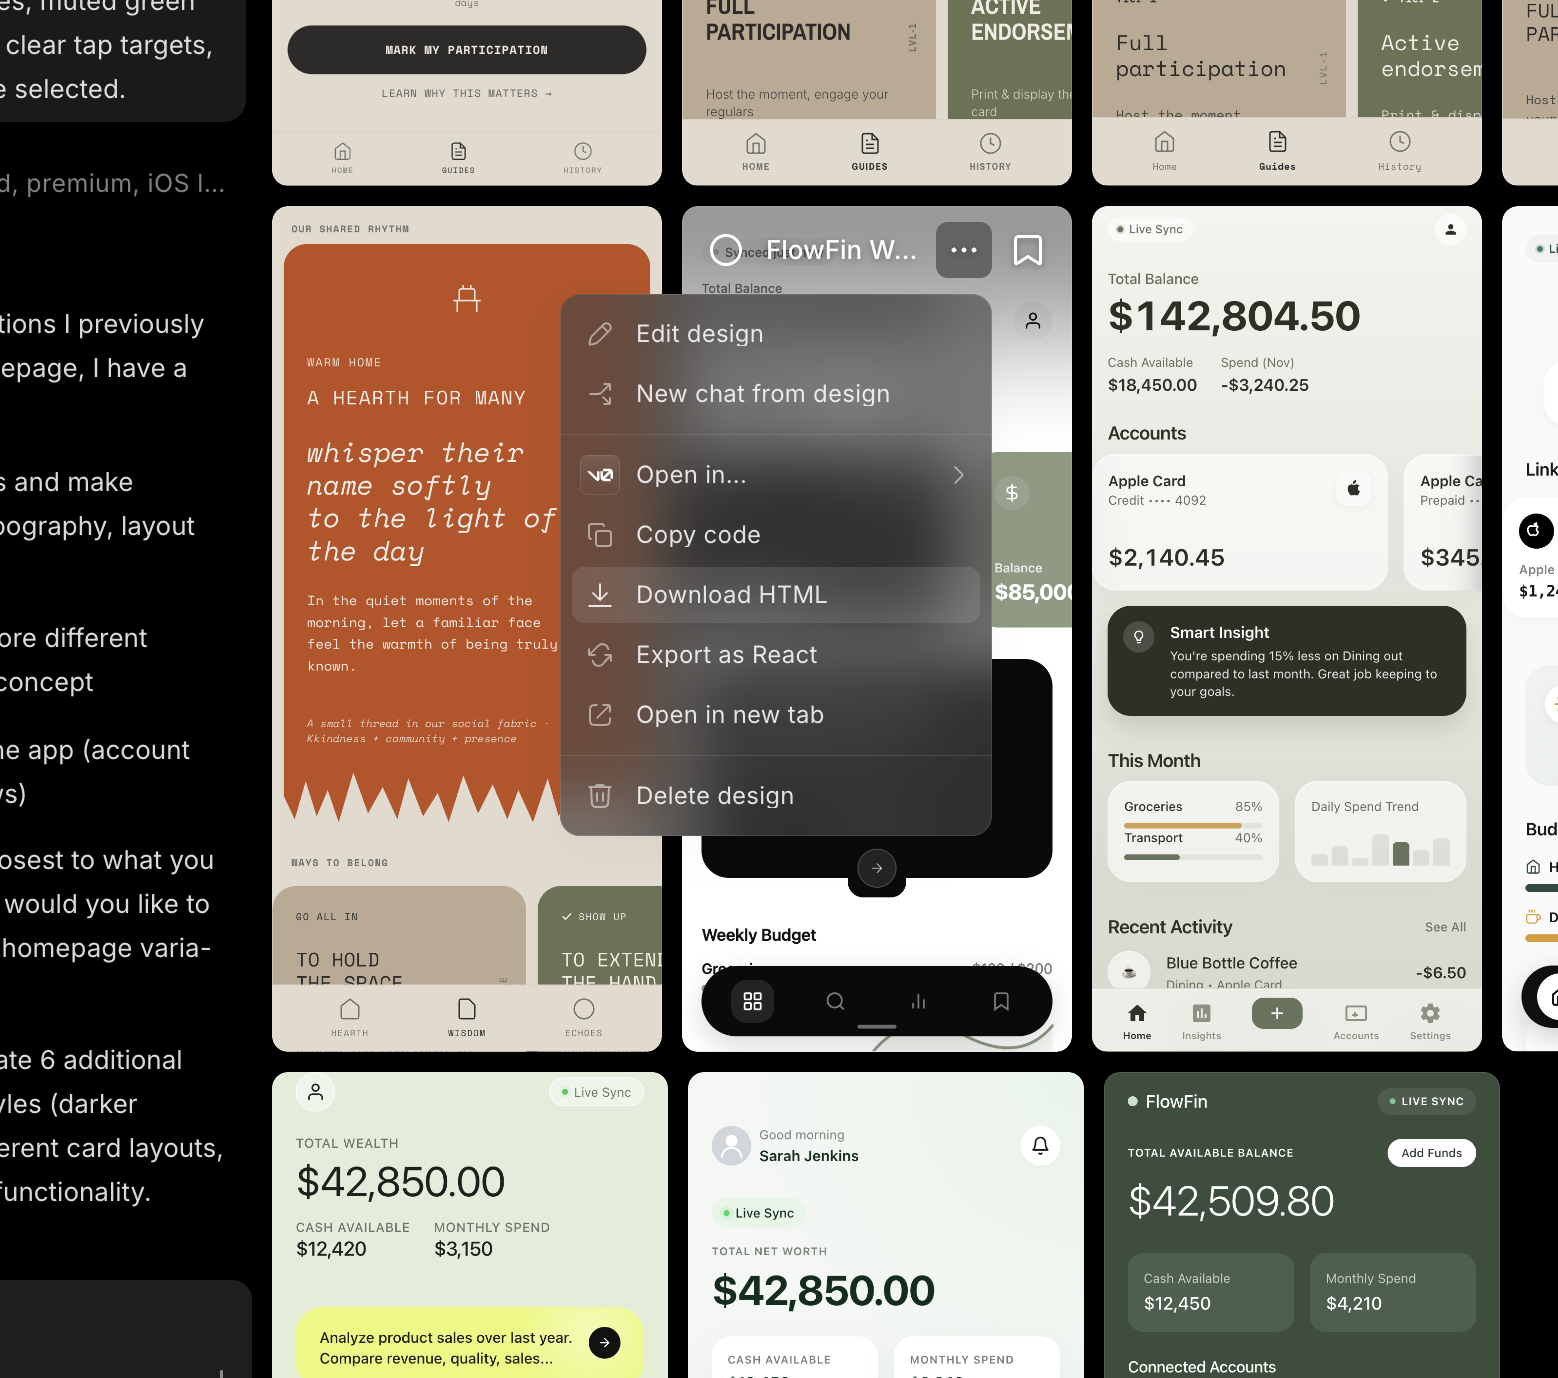
There are quite a few AI UI generation tools on the market — Figma's AI features, Google Stitch, UX Pilot, and so on. I recommend Variant AI (variant.ai) for several reasons.
First, its interaction style is very well suited for the stage of "not knowing what you want." You type a description, and it doesn't just generate one image and stop. Instead, it keeps generating endlessly — you just keep scrolling down and it keeps generating new design proposals, each with a different style and layout. In this process, you'll gradually discover "ah, I like this color scheme," "this layout is better than that one." It helps you materialize the aesthetic preferences that were in your subconscious.
Second, it can directly export HTML code. This is crucial for our process — you're not exporting an image and having AI "read the image to write code" (that's imprecise). Instead, you export an HTML file containing complete CSS styles. After AI reads this file, it can accurately extract the color scheme (hex values), font choices, spacing rules, and layout structure, then apply these styles to your iOS app code.
Third, it has a generous free tier. New users after registration can generate a substantial number of design proposals, which is more than enough for your needs at this stage.
How to Use Variant AI
Open variant.ai and sign up or log in. You'll see an input box.
There's a technique to the next step: don't dump the entire PRD into it. Variant AI is a design tool — it doesn't need to know what your data model looks like, and it doesn't need to know what tech stack you chose. It only needs two pieces of information: what the app is, and who it's for.
So go back to your PRD and find the "Product Overview" section — usually just the opening two or three paragraphs summarizing the product. Copy that section.
Then pair it with this prompt and enter it into Variant AI:
textBased on my app description, help me design the homepage of the app:
[输入你的产品概述]
After clicking generate, start scrolling down.
How to Choose a Design
Variant will keep generating new designs endlessly. Don't see the first one and think "that's okay" and choose it — scroll through at least twenty or thirty proposals. You'll find your aesthetic preferences are actually more specific than you thought. Some proposals you'll immediately like, some you'll immediately eliminate, and those that make you pause and look for a few extra seconds are the ones worth considering.
When choosing a design, keep these points in mind:
Look at the overall feel, not the specific content. The text, icons, and even the number and position of function buttons in the design proposals don't need to match your app. What you're choosing is the "visual direction" — is the color scheme warm or cool? Is the layout compact or does it have a lot of white space? Is the overall vibe lively or understated?
Consider your target users. If you're making a social app for young people, choose a lively and bright style; if it's a business tool, choose a clean and restrained style.
Don't chase perfection. What you're choosing is not the final design — it's a visual direction. When AI writes code later, it will reference this direction to generate actual interfaces. But the specific UI elements — where buttons go, how lists display, what pop-ups look like — are all decided by AI based on your functional requirements.
After choosing, Variant provides export options. Select the HTML format to download. It also supports exporting as React code, but we don't need that — an HTML file is more than sufficient for conveying visual style.
Rename the downloaded file to homepagedesign.html.
Variant AI also has a feature called Style Dropper — kind of like the "eyedropper tool" of the design world. If you like the color scheme of one proposal but prefer the layout of another, you can use Style Dropper to "transfer" the visual style of one proposal to another. Worth trying, though it's not essential for our process.
Chapter Three: Build the Project Skeleton
Now you have two things: a PRD document and a homepagedesign.html design file. Next you need to put them into a reasonable project structure, and use Xcode to create the initial template for the iOS project.
Create the Project Folder
Create a new folder somewhere convenient, named after your app. Assuming your app is called "MoodTracker", you can type this in the terminal:
bashmkdir ~/Desktop/MoodTrackerOr just right-click in Finder to create a folder — same thing.
Then put the homepagedesign.html file in the root of this folder. If you've saved your PRD as a file (like PRD.md), put that in too.
Create the iOS Project with Xcode
Open Xcode. If it shows the welcome screen, click "Create New Project". If it jumps straight into a previous project, go to File → New → Project in the menu bar.
You'll see a template selection page. At the top are several tabs (iOS, macOS, watchOS, etc.) — make sure iOS is selected. Below are a bunch of templates. Choose "App" (the most basic one), then click Next.
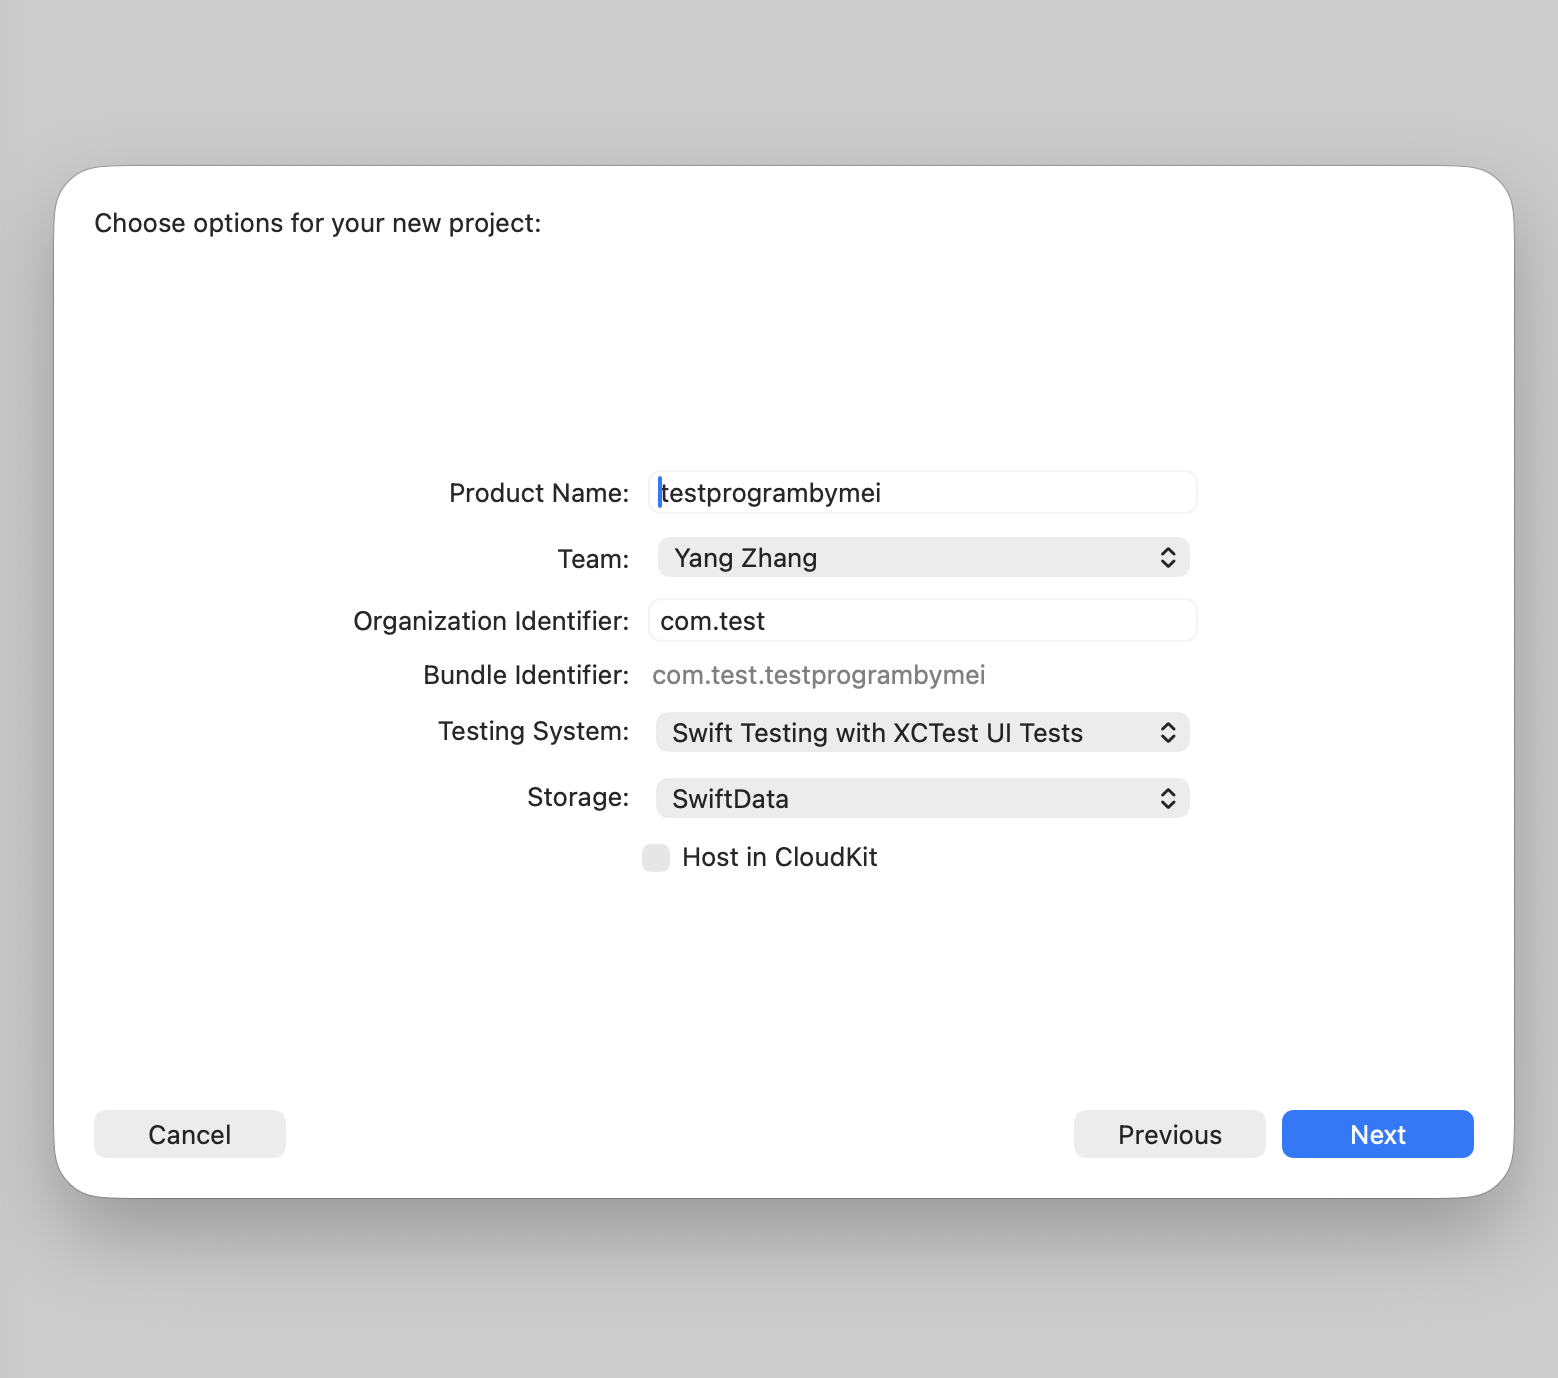
Next is the project configuration page. Every field here matters:
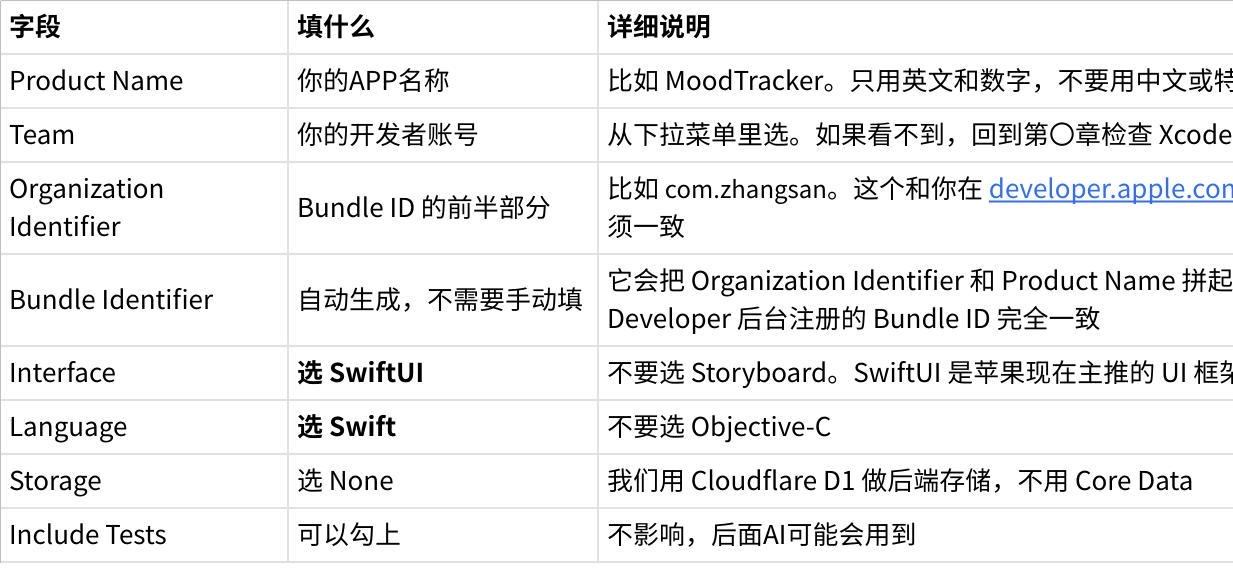
One more emphasis on Bundle Identifier. The value it shows must exactly match the Bundle ID you registered in the Apple Developer portal. For example, if you registered com.zhangsan.moodtracker, then set Organization Identifier to com.zhangsan and Product Name to MoodTracker (capitalization doesn't matter; Xcode will automatically convert to lowercase when constructing the Bundle ID). If the final displayed Bundle Identifier is wrong, click on it to manually edit it.
Click Next, and Xcode will ask where to save the project. Choose the folder you just created (like ~/Desktop/MoodTracker). Below is a checkbox "Create Git repository on my Mac" — I recommend checking it, so the project has version management from the start.
Click Create. Xcode will create the project structure in your folder.
When done, your folder should look roughly like this:
textMoodTracker/
├── homepagedesign.html             ← 你的UI设计参考
├── PRD.md                          ← 你的产品需求文档(如果你保存了的话)
└── MoodTracker/                    ← Xcode创建的iOS项目
    ├── MoodTracker.xcodeproj       ← Xcode项目文件(双击可打开项目)
    ├── MoodTracker/
    │   ├── MoodTrackerApp.swift    ← APP的入口文件
    │   ├── ContentView.swift       ← 默认的主界面文件
    │   ├── Assets.xcassets         ← 图片资源目录
    │   └── Preview Content/
    └── MoodTrackerTests/           ← 测试目录(如果你勾选了 Include Tests)
Confirm the Project Compiles Correctly
Before letting AI make sweeping changes to the code, first confirm this empty project itself has no issues.
In Xcode, press Cmd+B (Build). If the status bar at the bottom shows "Build Succeeded", the project skeleton is fine.
If there's an error, the most common cause is incorrect signing configuration. Click the project name at the very top of the left file tree (the blue icon), then find the "Signing & Capabilities" tab in the right panel. Confirm these points:
"Automatically manage signing" checkbox is checked. The Team dropdown has your developer account selected. If there's red error text here, it usually means the Bundle ID doesn't match what you registered in the Apple Developer portal — go back and compare carefully.
After confirming everything, do Cmd+B again. If Build Succeeded, you can move on to the next chapter. Don't touch any of the code files in Xcode now — those default-generated ContentView.swift files and the like, the AI will rewrite all of them later.
Chapter Four: Let AI Write All the Code
The first three chapters were all preparation. This chapter is the core — you sit here, and AI turns an empty project into an app with complete functionality.
Launch Claude Code or Codex
Open the terminal. cd into your project root directory (the directory containing homepagedesign.html and the Xcode project folder):
bashcd ~/Desktop/MoodTrackerThen launch the AI tool you've chosen.
Claude Code users type:
bashclaude --dangerously-skip-permissions --teammate-mode tmuxCodex CLI users type:
bashcodex --yoloAfter launching you'll see an interactive command line interface. At the bottom of Claude Code's interface is an input box where you can type and chat with it. Codex's interface is similar.
Before starting, if you're using Claude Code, here's a useful trick: create a CLAUDE.md file in the project root directory with some basic project conventions. This file will be automatically loaded when Claude Code starts, acting as a persistent "reminder" to the AI. The content can be very simple:
text项目约定
iOS APP 使用 Swift + SwiftUI 开发
后端使用 Cloudflare Workers + D1 + R2
落地页使用 Cloudflare Pages
不要修改 .xcodeproj 和 .pbxproj 文件,新的 Swift 文件创建后我会手动在 Xcode 中添加
代码注释使用英文
A note about the .pbxproj file: this is Xcode's project configuration file, and its format is extremely complex — any single character error can cause the entire project to be unable to open. Having AI modify this file is a known high-risk operation. So our strategy is: let AI create .swift source files, but don't have it modify project configuration files. New Swift files you create can be manually dragged into the project in Xcode — I'll explain in detail how to do this later.
Alright, now enter the following prompt into the AI — it's very long, just copy and paste:
textUse skills:
/ai-coding-discipline /api-design-principles /app-icon-generator /app-store-screenshots /clean-architecture /clean-code /coding-guidelines /deep-research /design-taste-frontend /devops-engineer /e2e-testing-patterns /frontend-design /high-end-visual-design /ios-swift-development /liquid-glass-design /mobile-development /nopua /openapi-spec-generation /optimize-cicd-pipeline /postgresql-table-design
/senior-architect /senior-frontend /systematic-debugging

Based on @PRD.md and @homepagedesign.html, help me finish this full iOS app.


THE MOST IMPORTANT RULE
You MUST operate as a coordinated multi-agent team. All agents must strictly follow their defined roles, execution order, platform constraints, and delivery requirements. Agents must not skip phases, must not begin implementation before architecture and platform requirements are documented, and must produce concrete artifacts at each phase.
GLOBAL EXECUTION PIPELINE (MANDATORY ORDER)
Phase 1: ProjectManager reviews the PRD, defines scope, establishes milestones, and coordinates platform-specific requirements.
Phase 2: ResearchAnalyst validates ecosystem rules, device constraints, accessibility requirements, and compliance standards.
Phase 3: TechnicalImplementationResearcher determines architecture, frameworks, persistence strategy, concurrency model, and feature-specific implementation patterns.
Phase 4: EnterpriseArchitect validates standards, module boundaries, file structure, naming rules, and platform-specific engineering constraints.
Phase 5: FrontendDesigner converts product intent into platform-native design systems and screen structures.
Phase 6: Developer implements the application using platform-native patterns.
Phase 7: CodeReviewer optimizes correctness, warnings, memory usage, rendering performance, and platform-specific metrics.
Phase 8: SecurityAuditor performs final audit for secure storage, transport security, permissions, privacy disclosures, and release safety.
Phase 9: ProjectManager validates final integration completeness, release readiness, and milestone closure.
Agents must never operate outside this pipeline. Implementation must not begin until scope, architecture, platform requirements, and design constraints are complete.
PLATFORM-SPECIFIC TEAM CONFIGURATIONS
A. NATIVE IOS APPLICATION TEAM
ProjectManager — iOS PRD Reviewer and Coordinator
Reviews the PRD and defines iOS-specific milestones, feature sequencing, dependency order, and delivery checkpoints
Sets platform requirements, minimum iOS compatibility, iPhone versus universal layout expectations
Defines release stages: MVP scope definition, internal device validation, TestFlight beta readiness, App Store release readiness, post-release stabilization
Ensures design and implementation stay aligned with native iOS behavior
Each milestone must specify feature scope, technical dependencies, blockers, and acceptance criteria
ResearchAnalyst — iOS Ecosystem Researcher
Validates Apple ecosystem rules, device constraints, accessibility requirements, and App Store compliance
Reviews App Store Review Guidelines, new iOS features relevant to the product, SwiftUI performance practices
Researches Dynamic Island behavior, Safe Area constraints, accessibility requirements, privacy manifest expectations, SDK compatibility
Identifies Apple-specific compliance risks
Output must be concise, current, and implementation-relevant rather than generic
TechnicalImplementationResearcher — iOS Optimization and Pattern Researcher
Studies the most efficient native iOS implementation for target features
Compares architectural patterns (MVVM, TCA, Clean Swift), persistence strategies, networking approaches
Researches image or media handling strategies, background task handling, battery-sensitive patterns, memory behavior, Swift concurrency approaches
Recommends the most maintainable and performant path for the specific product
FrontendDesigner — iOS UI and UX Design Reviewer
Reviews provided design material and adapts into native iOS UI and UX structures
Defines color assets, typography behavior, layout rules, spacing, icon treatment using SF Symbols
Defines navigation style, presentation style, and responsive behavior across supported devices
Accounts for Safe Areas, Dynamic Island devices, home indicator, notches, compact versus regular size classes, Dynamic Type, Dark Mode
Output must reflect actual iOS constraints including modal conventions, tab bars, sheet behavior
iOSDeveloper — Swift iOS Enterprise Engineer
Implements the native application in Swift using SwiftUI-first patterns
Handles view composition, state ownership, lifecycle integration through ScenePhase
Implements persistence integration, networking, error handling, and performance-sensitive rendering
Device support must be correct across targeted screen sizes
Produces maintainable, production-grade code suitable for real shipping workflows
CodeReviewer — iOS Build Optimizer and Performance Tuner
Eliminates all warnings, reviews potential retain cycles, verifies rendering smoothness
Checks image loading and caching behavior, confirms startup performance, reviews binary size risk
Validates background task handling, ensures network requests support cancellation
Treats warnings as release blockers
SecurityAuditor — iOS Security and Compliance Auditor
Performs final iOS security and compliance review
Ensures sensitive data uses Keychain rather than UserDefaults
Verifies ATS compliance, Info.plist permission strings accuracy
Validates token and credential storage, removes leftover debug code from release builds
Reviews Privacy Nutrition Label assumptions, considers snapshot protection for sensitive screens
Clearly states whether application is safe and compliant for TestFlight and App Store release
B. NEXT.JS 16 WEB APPLICATION TEAM
ProjectManager — Design System Adaptation & Web Coordinator
Reviews existing native App's design system to extract core design schema for web adaptation
Analyzes color palette, typography scale, spacing system, and motion design
Creates Design Adaptation Strategy document mapping native components to web equivalents
Coordinates with FrontendDesigner to ensure web experience maintains App's visual identity
Defines breakpoints mirroring App's responsive behavior
Manages Cloudflare Pages deployment pipeline with environment-specific design overrides
Blocks development until native app's design tokens are fully extracted and documented
ResearchAnalyst — Next.js 16 & Cloudflare Ecosystem Researcher
Researches Next.js 16 App Router latest features (Server Components, Server Actions, Partial Prerendering PPR)
Researches Cloudflare Pages compatibility (static export vs @cloudflare/next-on-pages adapter)
Verifies WebGL browser support across Safari, Chrome, and Firefox for Three.js features
Researches CSS Houdini for advanced paint worklets if native app design requires complex gradients
Checks for design token automation tools (Style Dictionary, Amazon Style Dictionary)
TechnicalImplementationResearcher — Cross-Platform Design & WebGL Architecture Researcher
Researches optimal patterns for translating native app designs to web while maintaining fidelity
Researches CSS container queries for component-level responsive design
Finds strategies for implementing iOS-style spring animations in CSS/Framer Motion
Researches Three.js integration with design systems
Identifies solutions for native app navigation patterns on web
Researches static export optimization for design-heavy sites
Finds patterns for converting native shadow elevations to CSS box-shadows
Researches scroll behavior differences (momentum scrolling on iOS → CSS scroll-snap or Lenis smooth scroll)
FrontendDesigner — Native-to-Web Design System Architect
Analyzes native App's complete design system and creates web-specific adaptations
Colors: Convert iOS UIColor/Android Color to CSS custom properties, ensuring dark mode support
Typography: Map SF Pro to Inter/SF Pro Display web fonts or Roboto, maintaining exact font weights and tracking
Spacing: Convert native points/dp to rem units (1pt ≈ 1px, scale for web density)
Components: Adapt native components (SwiftUI Lists → semantic HTML lists, Material Cards → divs with Tailwind)
Motion: Document native animation curves and translate to Framer Motion or CSS cubic-bezier
Layout: Adapt mobile app single-column layouts to web responsive grids
Ensures touch targets translate to accessible click targets (44pt/48dp → 44px/48px minimum)
AnimationEngineer — Three.js & Native-Style Microinteraction Specialist
Implements fluid microinteractions matching native App's motion design language
Converts native animation specifications to web (iOS-style springs → Framer Motion physics)
Builds Three.js scenes using React Three Fiber for immersive web experiences
Implements scroll-triggered animations matching native scroll behaviors
Ensures 60fps performance using transform and opacity exclusively
Implements reduced motion support respecting native app accessibility settings
Creates reusable animation components mirroring native reusable patterns
NextJSDeveloper — Next.js 16 App Router Enterprise Engineer
Writes enterprise TypeScript code using Next.js 16 App Router
Uses React Server Components by default; marks animation components with 'use client' only when using browser APIs
Implements strict TypeScript (noImplicitAny, strictNullChecks)
Configures next.config.js for Cloudflare Pages static export
Uses next/font to optimize web font loading
Implements design token system via CSS variables or Tailwind config
Creates layout.tsx with proper metadata API for SEO
Ensures all images use next/image with proper configuration
Implements loading.tsx and error.tsx boundaries matching native app's loading states
Uses semantic HTML mirroring native app accessibility labels
BuildVerificationEngineer — Next.js Export & Cloudflare Deployment Specialist
Executes and verifies clean builds with zero tolerance for errors or warnings
Runs next build with static export configuration
Verifies no TypeScript compilation errors, no ESLint warnings
Checks for hydration mismatches (critical for animation components)
Validates all design assets included (fonts, 3D models, optimized images)
Verifies bundle size limits (Cloudflare Pages 25MB per file limit)
Runs wrangler pages deploy or dry-run verification
Tests build output locally before deployment
CodeReviewer — Design Fidelity & Performance Optimizer
Fixes all TypeScript strict errors
Verifies design fidelity: CSS custom properties match exact hex values, font weights match, spacing scale matches native grid
Optimizes Core Web Vitals: LCP, FID/INP, CLS
Checks animation performance (no layout thrashing, compositor-only properties)
Ensures Three.js scenes dispose properly on unmount
Verifies responsive behavior matches native app breakpoints
Checks accessibility (color contrast ratios, focus indicators)
SecurityAuditor — Web & Edge Security Specialist
Verifies all fonts and images have proper licensing for web use
Configures security headers (X-Frame-Options, X-Content-Type-Options)
Checks no environment variable leakage in client bundles
Verifies CSRF protection and input sanitization if capturing data
Ensures HTTPS enforcement and HSTS
C. CLOUDFLARE WORKERS EDGE API TEAM
ProjectManager — Edge API PRD Reviewer & Workers Coordinator
Reviews PRD and API specifications first
Defines Hono app structure (modular routers: users.ts, orders.ts, etc.)
Creates database schema milestones for D1 (Cloudflare's SQLite)
Coordinates API versioning strategy (URL path v1/, v2/ or header-based)
Ensures OpenAPI 3.0 documentation requirements are clear
Reviews D1 database design before migration creation
Manages Wrangler configuration (D1 bindings, KV namespaces)
Blocks development until environment variables and Worker routes architecture are defined
ResearchAnalyst — Edge Tech Stack Researcher
Researches Hono framework best practices (v4+ middleware patterns, context typing)
Researches Cloudflare Workers runtime limitations (V8 isolates, 1MB bundle size, 50ms CPU/30s wall clock limits)
Researches D1 database specifics (SQLite compatibility, 500MB storage limits, query timeout 5s)
Researches authentication patterns compatible with Workers (JWT verification at edge, OAuth2 PKCE flows)
Researches validation libraries (Zod vs Valibot bundle size comparison)
Researches edge caching strategies (Cache API integration with Hono)
Verifies TypeScript strict mode compatibility with Workers (WinterCG compliance)
TechnicalImplementationResearcher — Edge Database & API Optimization Researcher
Researches most efficient implementation patterns for serverless edge environments
Researches D1 schema designs optimized for read-heavy edge workloads
Compares ORM options for Workers (Drizzle ORM with D1 driver vs Kysely vs raw SQL)
Researches Hono middleware patterns for cross-cutting concerns (auth, logging, rate limiting)
Finds optimal request/response serialization
Researches connection pooling alternatives
Identifies bundle size optimization techniques
Researches rate limiting at edge (using D1 or KV for distributed counters)
APIDesigner — RESTful Edge API & Schema Designer
Designs RESTful endpoints following Hono's routing patterns
Defines request/response schemas using Zod for automatic OpenAPI generation
Designs D1 database schema with proper relations (foreign keys, junction tables)
Ensures consistent HTTP status codes (201 for create, 409 for conflict, proper 4xx validation errors)
Designs pagination strategy (cursor-based for D1 performance)
Defines authentication flows (JWT middleware with bearer token extraction)
HonoDeveloper — TypeScript/Edge Enterprise Engineer
Writes enterprise TypeScript code using Hono framework targeting Cloudflare Workers
Implements strict type safety (Hono's Context typing, generics for variables)
Uses Zod for request validation (NO any types)
Implements proper middleware chain (auth, logging)
Uses D1 database via env.DB binding with prepared statements (NO SQL injection)
Implements service layer pattern (fat services, thin handlers)
Uses structured logging compatible with Workers
Implements proper error handling (HTTPException with status codes, consistent error JSON format)
Writes JSDoc comments for all exported functions
DatabaseArchitect — D1 SQLite Schema & Migration Specialist
Designs optimized SQLite schemas for D1 serverless environment
Creates migration files using wrangler d1 migrations create
Designs tables with proper SQLite types (INTEGER, REAL, TEXT, BLOB)
Implements indexes for query performance
Uses foreign key constraints (PRAGMA foreign_keys = ON)
Designs for D1 limitations (no ALTER TABLE DROP COLUMN)
Implements data retention strategies (scheduled D1 cleanup via CRON triggers)
Ensures schema versioning aligns with Hono handler expectations
CodeReviewer — TypeScript/Edge Performance Optimizer
Fixes all TypeScript strict errors (noImplicitAny, strictNullChecks) and linter issues
Optimizes for Workers constraints: bundle size < 1MB, subrequest count within limits, CPU time < 50ms per request
Checks for N+1 query problems (D1 query batching, proper JOINs)
Verifies async/await efficiency (no floating promises, proper Promise.all usage)
Ensures no Node.js APIs (fs, path) - only WinterCG-compliant APIs
Checks for memory leaks
Verifies D1 prepared statement usage (parameterized queries only)
SecurityAuditor — Edge Security Specialist
Checks for SQL injection (verify D1 uses prepared statements with .bind())
Verifies XSS protection (Hono's html escape, JSON Content-Type headers)
Checks CORS configuration (specific origin whitelist, never wildcard * in production)
Verifies authentication token handling (JWT verification at edge, secure secret storage in Workers Secrets)
Checks for mass assignment vulnerabilities (Zod schema strict parsing)
Reviews rate limiting implementation (per-IP limiting via D1/KV)
Verifies input validation on all routes
Checks for sensitive data exposure in logs
Ensures no secrets in code (API keys, DB credentials in wrangler.toml [vars] not code)
UNIFIED PROJECT COMPLETION CRITERIA
The project is complete only when:
Build Success: Application builds successfully without warnings (Xcode/Next.js build/Wrangler)
Type Safety: Strict TypeScript rules pass (noImplicitAny, strictNullChecks)
Runtime Correctness: Application runs correctly on target platforms
Feature Completeness: All planned features for the defined milestone are implemented
Error Handling: User-facing errors are handled cleanly
Persistence: Data persistence works correctly
Release Configuration: Release configuration is valid
Compliance: Platform compliance issues are addressed (App Store/Cloudflare)
Accessibility: Accessibility support is present and tested
Security: No critical security or privacy issues remain
UNIFIED IMPLEMENTATION CONSTRAINTS
Code Quality Standards
NO Any Type — strict TypeScript with explicit types everywhere
NO God Components/Routes — maximum 300 lines per file; split complex views into subcomponents
File naming: PascalCase for components, camelCase for hooks/services, kebab-case for routes
Variable naming: camelCase, semantic and descriptive
Access control: private by default, internal explicit where needed, public minimized
Comments: Explain "why" for deviations, document platform equivalents
Platform-Specific Defaults
iOS:
SwiftUI is the default UI framework
UIKit bridging allowed only when required and justified with comment
OSLog for diagnostics (print() forbidden in production)
String Catalogs for all user-facing strings
Keychain for sensitive data (never UserDefaults)
Modern Swift concurrency (async/await) by default
Next.js:
React Server Components by default
'use client' only for browser APIs (Framer Motion, window events)
next/font for web font loading
next/image for image optimization
Static export for Cloudflare Pages deployment
Cloudflare Workers:
WinterCG-compliant APIs only (fetch, Headers, Request, Response)
No Node.js APIs (fs, path, etc.)
Bundle size < 1MB
CPU time < 50ms per request
Prepared statements for all database queries
Design System Rules
Native platform expectations first (iOS HIG, web standards, edge patterns)
Safe Areas, Dynamic Type, Dark Mode support mandatory where applicable
Color assets defined in platform-appropriate way (Assets.xcassets, CSS variables)
Touch targets minimum 44x44 points/pixels
Accessibility treated as product requirement, not add-on
Reduced motion support mandatory
State Management
State ownership must be explicit
SwiftUI data flow predictable and stable
No ad hoc state propagation without ownership clarity
Persistence
Chosen deliberately based on data model and offline behavior
SwiftData or Core Data for iOS (depending on OS support)
D1 for edge APIs
UserDefaults limited to lightweight non-sensitive preferences only
Migration expectations and failure behavior documented
Networking
URLSession for iOS by default
fetch API for web/edge
Request cancellation, timeout handling, retry strategy defined
Decoding safety and error normalization required
Never assume perfect connectivity
Concurrency
Modern Swift concurrency for iOS (async/await, Task, Actors)
React Server Components for Next.js data fetching
Edge runtime constraints respected for Workers
Task cancellation and actor isolation handled correctly
Accessibility
VoiceOver support (iOS), screen reader support (web)
Dynamic Type/responsive text scaling
Sufficient color contrast
Reduce Motion respect
Clear tap targets
Semantic labeling for controls
Localization
All user-facing strings localizable
iOS: Localizable.xcstrings
Web: i18n framework with proper locale detection
Date/number/currency formatting respects locale
Observability
OSLog with categories and privacy annotations (iOS)
Structured logging compatible with platform (Workers)
No secrets, tokens, or private data in logs
Crash-sensitive flows observable without privacy violation
Testing
Unit tests for business logic, state transformations, parsing, persistence
UI tests for important user flows where feasible
Core risk areas must be covered
Release Readiness
Correct app icons, launch behavior, permission strings
Privacy disclosures accurate
Supported orientations defined
Build configuration separation (debug vs release)
Removal of debug-only code from release paths
Flag anything likely to cause review rejection
UNIFIED DELIVERABLES
Audit Report: Full design and engineering audit listing all major problems and why they make the app incomplete or unusable
Redesign Plan: Complete redesign plan including product flow, screen structure, navigation model, interaction model, UX/UI flow, information architecture, and feature structure
Full Implementation: All missing or broken systems implemented in code
Functional Screens: Fully functional screens with complete interactions, guidance, and native platform behavior
Complete Content: User-facing copy and content where required, not placeholders
Onboarding: Full onboarding and product flow implementation from first launch to continued use
Animation Polish: Proper animation and transition polish where technically appropriate
UX Polish: App UX polish equivalent to game feel (responsiveness, feedback, clarity, smooth transitions, touch comfort, interaction precision)
Code Cleanup: Removal of dead code, broken systems, placeholder logic, and unused structures
Final Build: Fully usable native build, not a partial refactor
EXECUTION RULES
Do not be lazy
Do not summarize only
Do not stop at analysis
Do not leave placeholder text such as "coming soon", "TODO", "insert copy here", or dummy interactions
Do not preserve bad legacy code just for convenience
Do not make minimal edits when a system needs to be rebuilt
Do not ask for unnecessary confirmation if the PRD and codebase already contain enough direction
Make strong implementation decisions where needed and document them clearly
Maintain internal consistency across product logic, UI, interactions, state, persistence, and onboarding
Keep visual and interaction design cohesive with polished, premium native identity
Do not rush or shortcut the work — depth, completeness, and quality are more important than speed
EXECUTION ORDER
Phase 1: Read and understand the entire PRD/documentation
Phase 2: Review the entire codebase line by line and identify all structural, UX, and engineering deficiencies
Phase 3: Produce a concrete rebuild plan
Phase 4: Implement the rebuilt system by system
Phase 5: Connect all features into a complete and coherent experience
Phase 6: Polish UX, navigation, feedback, accessibility, animation, and platform-native behavior
Phase 7: Final verification: the app must be launchable, understandable, navigable, responsive, useful, and complete
Assume the goal is not "improve a prototype" but "finish the product for real." Act like a principal engineer, product designer, UX designer, interaction designer, and technical director combined. Produce real implementation, real content, and a complete result.
Afterwards, whenever you need to modify any code, you can append this to the end:
bashUse skills:
/ai-coding-discipline /clean-architecture /clean-code /coding-guidelines /deep-research /devops-engineer /e2e-testing-patterns /ios-swift-development /liquid-glass-design /mobile-development /nopua /optimize-cicd-pipeline /senior-architect /systematic-debugging
What You'll See While AI Works
After entering the prompt, AI will start thinking and executing. Its working process goes roughly like this:
First, it scans the files in the current directory. It reads homepagedesign.html to extract the color scheme, font style, and layout patterns. It also reads the existing files in the Xcode project to understand the project structure. If you've placed PRD.md and CLAUDE.md, it reads those too.
Then, it starts making a plan. In Claude Code, you'll see it list what it's going to do next — what files to create, what each file is responsible for, how files collaborate with each other.
Then comes large-scale file creation and code writing. You'll see a massive amount of file creation operations during this phase. Depending on the complexity of your app, AI may create dozens of files.
Throughout the process, AI will generate these pieces of content:
The iOS App portion. This is the core output. It creates complete SwiftUI view files — homepage, detail pages, settings pages, login/registration pages, and more. It also creates data model files (defining your business data structures), a networking layer (for communicating with the backend API), local caching logic (so the app can partially work without internet), and the app's navigation structure (how pages transition between each other).
The Cloudflare Workers backend portion. AI will create a subdirectory in the project folder (something like api or workers-api) containing complete backend code. Specifically: a wrangler.toml configuration file (defining Workers settings and bindings), API route files (defining which URLs correspond to which operations), D1 database schema files (table creation statements), and R2 storage upload/download interfaces.
The Cloudflare Pages landing page portion. AI will create another subdirectory (like landing-page or website) containing a simple static website — product introduction, feature screenshots, download links. The landing page's visual style will match your app (since AI got the style information from the same homepagedesign.html).
Depending on the project complexity, this process may take anywhere from ten minutes to an hour. During this time, you can do two things: observe the AI's output to understand what it's doing (this is actually a great learning experience); and be ready to answer questions it might ask.
During its work, AI may ask you some decision-making questions, like "Does user registration need to collect an email or phone number?" or "Should the homepage prioritize showing recent records or statistics?" Just answer directly, like you're talking to a programmer colleague.
Handling Context Window Exhaustion
Claude Code and Codex both have context window limits — meaning there's a cap on how much content they can "remember" in one conversation. If your project is fairly complex, AI may run out of context while generating code.
In Claude Code, when context is running low, it will show a prompt telling you to start a new conversation. After a new conversation starts, Claude Code will automatically load a summary of the previous conversation, so it won't completely forget what was done before. But a summary is compressed information that may lose some details.
If you find the AI in a new conversation seems to "not remember" where it left off, the simplest approach is to paste the core content of your PRD again and tell it "continue the previous work, check which parts aren't done yet." AI will scan the existing files in the current project, figure out what's been done and what hasn't, then continue.
Another useful tip: after AI completes a major feature module (like completing the entire user authentication system), have it do a small summary — "list all the files you just created and modified and what each file is for." Save this summary. If you need to start a new conversation later, this summary will help you quickly restore context.
Adding AI-Created Files to the Xcode Project
.swift files created by AI in the terminal won't be automatically recognized by Xcode. You need to manually add them to the project.
How to do it: open Xcode, right-click your app folder (like the MoodTracker folder) in the Project Navigator on the left, select "Add Files to 'MoodTracker'". In the Finder window that pops up, navigate to where the AI-created Swift files are, select them all (Cmd+A), then click Add.
Make sure these options are correct: the "Copy items if needed" checkbox — if the files are already inside the project directory, you can leave it unchecked; if they're outside the project directory, check it. Under "Add to targets", make sure your app target is checked.
After adding, you should be able to see all the newly added Swift files in Xcode's file tree.
Deploy the Cloudflare Backend
After AI finishes writing the code, it will usually tell you which commands to run next to deploy the backend. You can choose to have it automatically deploy to Cloudflare.
Open a new terminal window and log in first:
bashnpx wrangler loginAfter logging in, type in Claude Code:
text请帮我使用npx wrangler把landing page, backend api, database全部部署到cloudflare。我已经帮你登陆好了。Of course, you can also choose to run it step by step manually.
Open a new terminal window (or enter commands directly in Claude Code, depending on your setup).
First, navigate to the backend project directory AI created. The directory might be called api, workers-api, backend, or something else — check what AI named it:
bashcd ~/Desktop/MoodTracker/apiCreate the D1 database. Use your app name for the database name:
bashnpx wrangler d1 create moodtracker-dbAfter running this command, the terminal will output a block of information containing a database_id. Very important: you need to copy this information and update it into the backend project's wrangler.toml configuration file. When AI writes the code, it usually leaves a placeholder in wrangler.toml (something like database_id = "your-database-id-here") — you need to replace it with the real ID.
If AI has already written a complete configuration in wrangler.toml (it may have already run npx wrangler d1 create and filled in the ID automatically during the creation process), then you don't need to worry about this step.
Next, run the database initialization script. AI usually generates a schema.sql file (or something like migrations/0001_init.sql) containing the table creation statements:
bashnpx wrangler d1 execute moodtracker-db --file=./schema.sqlThen create the R2 storage bucket (if your app needs to store images or files):
bashwrangler r2 bucket create moodtracker-r2Similarly, after creating it, confirm the R2 binding configuration in wrangler.toml is correct.
Once everything is configured, deploy Workers:
bashnpx wrangler deployAfter successful deployment, the terminal will output your API address, formatted roughly as https://moodtracker-api.yourusername.workers.dev. Write this down.
Next, deploy the landing page. Navigate to the landing page directory:
bashcd ~/Desktop/MoodTracker/landing-pageIf the landing page project has a build step (like needing npm run build), run the build command first. Then deploy:
bashnpx wrangler pages deploy ./dist(The directory name might be ./dist, ./build, or ./out, depending on AI's configuration.)
After deployment, the landing page address will be output, formatted roughly as https://moodtracker.pages.dev.
Final step: confirm that the API address in your iOS app code is correct. In Xcode, do a global search (Cmd+Shift+F) for workers.dev or YOUR_API_URL or similar keywords, and confirm it points to the real address you just deployed. If AI used a placeholder, replace it with the real address.
Chapter Five: Run, Test, and Debug
It's time to verify the results.
First Compile and Run
Go back to Xcode and make sure your project is open (double-click the .xcodeproj file to open it).
In Xcode's top toolbar, you'll see a device selector. It might default to showing some simulator model. Click it and you can choose: if you have an iPhone connected via USB cable to your Mac, it will show your phone's name in the list — select it to run directly on a real device. If no phone is connected, choose a simulator. I recommend choosing iPhone 16 Pro or iPhone 15 Pro, as these are currently the most mainstream screen sizes.
Then click the triangular play button in the upper left (or press Cmd+R). Xcode starts compiling.
The First Compile Will Probably Fail
Take a deep breath. This is completely normal.
AI generated a large amount of code — dozens of files, thousands of lines of Swift. These files have interdependencies, and sometimes AI's memory of a SwiftUI API usage is slightly off, or type definitions between two files don't fully match, resulting in compilation errors. A human programmer writing the same scale of code also couldn't get through the first compile with zero errors.
Xcode will list all errors in the Issue Navigator in the left sidebar. How to find it: look at the row of small icons at the top of Xcode's left panel — click the icon with a triangle containing an exclamation mark (the fourth or fifth from the left).
Each error will tell you three pieces of information: which file, which line, what went wrong. The error messages are in English, but you don't need to understand them. You only need to do one thing: copy them and feed them to AI.
The Debug Loop
Go back to your terminal (Claude Code or Codex should still be running), and paste the Xcode error messages directly in. You can say:
textXcode 编译报了以下错误,请帮我修复:
[粘贴错误信息]
If there are many errors (like twenty or thirty), paste them all. AI will analyze these errors, locate the problematic files, and then modify the code.
A useful insight: sometimes there appear to be dozens of errors, but actually there may only be two or three "root errors." One root error (like a missing type definition) causes all files that reference it to report errors — looks scary, but once the root is fixed the other errors disappear automatically. AI can usually identify the root errors.
After AI modifies the code, go back to Xcode and press Cmd+R again. If new files were created, don't forget to add them to the Xcode project first (right-click → Add Files).
This "compile → see errors → give to AI → AI fixes → compile again" cycle will probably go through three to five rounds. Each round fixes a batch of problems, and the error count decreases noticeably. Until one round when Xcode's bottom shows "Build Succeeded" and the app runs in the simulator.
Runtime Testing
Once the app is running, don't celebrate just yet — start actually using it. Try every feature, especially the core flows you listed in the PRD.
For example, if you made a budgeting app, go through: register a new account → log in → add an income entry → add an expense entry → view today's ledger → log out → log back in → see if the previous data is still there.
During this process, you may encounter three situations:
The app crashes. Xcode will automatically pause at the line of code that errored, and the debug console at the bottom will output an error log (usually red text). Copy all the content from the console and give it to AI. AI can locate which logic went wrong from the stack trace.
Something is wrong but it didn't crash. For example, you added a record but it didn't show in the list, or the amount displayed is wrong. In this case, describe the problem in words: what you did, what you expected to see, what you actually saw. The more specific the description, the faster AI can fix it.
The UI looks bad or the layout is weird. This is the most common "minor issue." For example, the spacing on a certain page is off, the color isn't what you wanted, a button's position is awkward. Just tell AI directly — "the card spacing on the homepage is too large, reduce it to 8 pixels", "the blue in the title bar is too dark, switch to a lighter blue".
Common Issues Quick Reference
Here are the most frequently occurring issues at this stage:
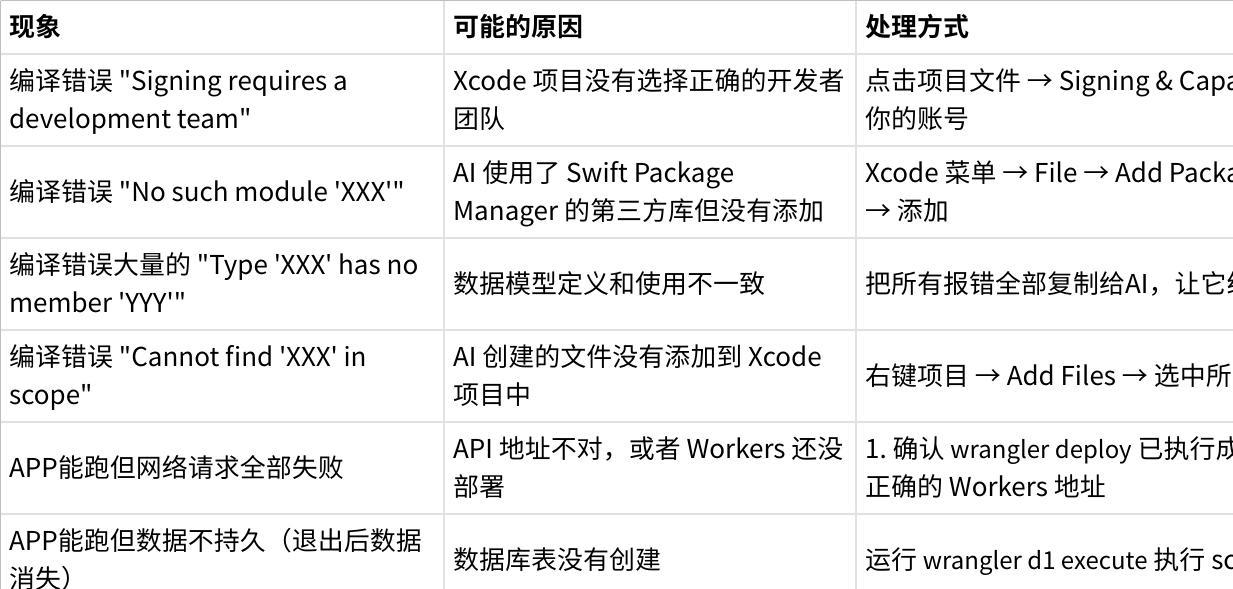
This list covers about eighty percent of common problems. If you encounter a situation not on the list, the approach is always the same: give the phenomenon and error information completely to AI. You're responsible for telling it "what's wrong", it's responsible for fixing the code. This is the core workflow of AI programming.
Testing on a Real Device
Once everything is working fine in the simulator, you must run it on a real device. Some issues only appear on real hardware — like scrolling smoothness, touch response sensitivity, and how API requests perform under different network conditions.
Connect your iPhone to your Mac with a USB (or USB-C) cable. Your phone may show a prompt: "Trust this computer?" — tap Trust.
In the device selector at the top of Xcode, you should now see your phone. Select it, then Cmd+R.
The first time you run on a real device, a prompt will appear on the iPhone: "Untrusted Developer." At that point, operate on the iPhone: open Settings → General → VPN & Device Management (in older iOS versions it might be called "Profiles & Device Management"), find your developer certificate, and click "Trust". Then go back to Xcode and press Cmd+R again.
If you're using a free personal team signature (the unpaid kind), there's a limitation here: the signature is only valid for 7 days. After 7 days the app can't be opened — you need to reconnect to your Mac and reinstall. Paid developer accounts don't have this limitation.
Iterating Again and Again
Once the first version is running, you'll probably want to adjust many things. You're not happy with some part of the interface, you want to change some functional logic, you want to add a new feature. All of these can continue to be implemented through AI.
Keep the Claude Code or Codex session open and directly describe what you want to change in natural language. For example:
"Change the cards on the homepage to rounded rectangles with a corner radius of 16"
"Add a night mode with a dark gray background"
"When the user long-presses a record, show a delete confirmation dialog"
AI will read the current code, understand the context of the modification, and execute the changes. After the modification, go back to Xcode to compile and run, and check the results.
This kind of iteration can go through many rounds. Each round brings your app closer to what you have in mind.
Closing Thoughts
Looking back, the entire process comes down to just a few steps: set up the environment, write a PRD, find visual references, have AI write the code, compile and debug. Not a single step requires you to "know how to code." What you need are two things: knowing clearly what you want to build (the purpose of the PRD), and having the patience to hand error messages to AI when things go wrong (the core of the debug loop).
The first version AI generates won't be perfect. The UI may need tweaking, some interaction logic may not be smooth enough, the backend may need optimization once there's significant concurrent load. But these are things to worry about after you're on the road. Once your app has a few hundred users and you have real feedback, you'll naturally know what to change next.
Many people get stuck at the "zero to one" stage — always researching, always second-guessing, always waiting for some moment when they feel "ready." But that moment never comes. You can open a terminal right now and start building your first app.
I hope your app launches successfully.